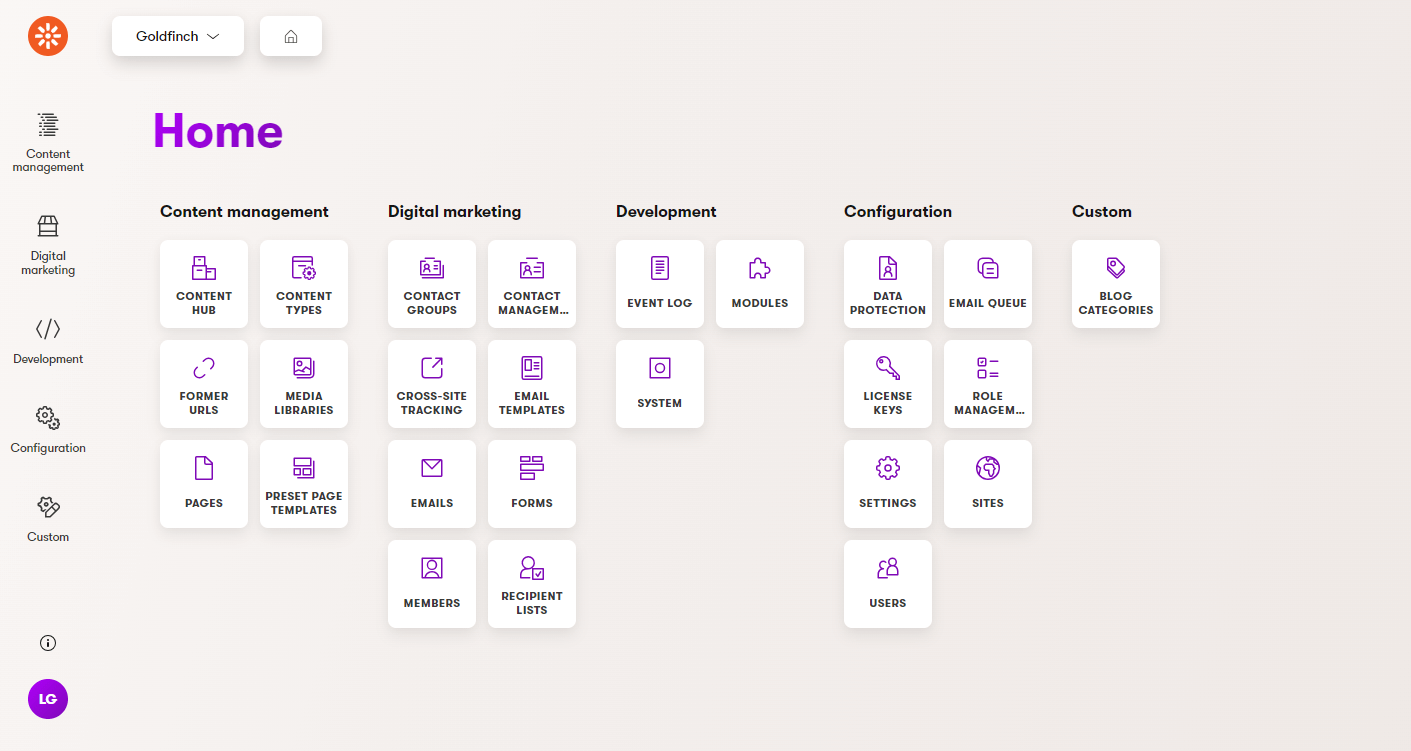
Over the years, I have built many websites in Kentico, and one of my favourite tasks has always been extending the admin interface by building custom modules and applications. Kentico provides flexibility with its out-of-the-box layouts, components, and tools, allowing you to effortlessly achieve complex user interfaces. This advantage becomes even more apparent when comparing it to other platforms!
I recently participated in Kentico's webinar, Xperience by Kentico: Summer Technical Session, where I demonstrated how I created a basic custom module in Xperience by Kentico. Now, let's recap the entire process from end to end. The example we will be covering is a simple module allowing users to create categories for blog posts.
Step 1 - Create a new module
Just like in Kentico Xperience 13, we start by creating a new module in the Modules application. We simply provide a display name and a code name that we want to associate with the module.
Step 2 - Create a Blog Category class
Once the module is created, we can now configure a class that will represent the data needed for the blog categories
To start, I create a new class and provide both a display name and a code name.
Next, I switch to the database columns tab to create the fields in the database. This is done by providing a field name and its corresponding data type.
Step 3 - Create UI forms for "Create" and "Edit" screens
After creating the database columns, our next step is to design 'create' and 'edit' forms that will be displayed to the user when they attempt to create or edit a blog category. These forms are separately managed so you can have different labels, visibility conditions, etc.
In each UI Form, I select the database column I want to display and configure its associated caption. Additionally, I choose a form component to allow users to populate the field.
Step 4 - Generate code files
Similar to Kentico Xperience 13, I prefer generating code files for my custom module objects. The generated files are object-specific, making it easier to interact with the objects. In Xperience by Kentico, this is done by running the code generation dotnet command:
dotnet run --no-build -- --kxp-codegen
    --type "Classes"
    --include "Goldfinch.*"
    --location "../Goldfinch.Core/{type}/{dataClassNamespace}/{name}/"
I am passing three parameters to the codegen tool to customise what will be generated and where the files are output:
- Type - allows us to configure which type of files are being output, e.g. Classes means only generate code files for object types (not page types, etc).
- Include - allows us to filter which objects are being output, e.g. in my example I am only outputting files with the namespace prefix Goldfinch and using a wildcard to match any class from that namespace.
- Location - allows us to control the path of the target location where the code files are generated. My example uses the default location, but I am going up a level first and then into a separate project called Goldfinch.Core.
This command will generate three classes for each object:
BlogCategoryInfo.generated.cs is the object type class that contains all the database fields as properties, making it easy to interact with them.
BlogCategoryInfoProvider.generated.cs is the info provider class that provides methods of data retrieval and manipulation.
IBlogCategoryInfoProvider.generated.cs is the matching interface for the generated info provider class, Kentico automatically registers the interface and implementation so you can dependency inject them into your own code wherever you may need them.
So far, the process of creating a custom module has been very similar to Kentico Xperience 13. You create the module within the admin site and generate the code files for it. However, Xperience by Kentico differs when it comes to creating the UI pages. Instead of using the User Interface tab of the module, Xperience takes a code-based approach. But don't worry – Kentico still provides easy out-of-the-box layouts.
Step 5: Create a new admin project
Let's start by scaffolding a new admin project. You don't need to start from scratch; Kentico already provides a boilerplate project you can use to kick-start the process.
Firstly, we need to run the code generation for an admin project using the following dotnet command:
dotnet new kentico-xperience-admin-sample -n Goldfinch.Web.AdminThis will generate a sample project with the following structure:
Goldfinch.Web.Admin/
├── Client/
│   └── ** React code lives here **
├── UIPages/
│   ├── CustomTemplate/
│   │   └── CustomTemplate.cs
│   └── UserListExtender/
│       └── UserListExtender.cs
└── WebAdminModule.cs
The first folder, Client, is where the boilerplate code allows you to add your own ReactJS-based templates and pages. You will only need to access this area when you start building really complex user interfaces or when you want to create bespoke components to use within the admin site. As we are creating a basic module, we don't need to use ReactJS at all, we'll cover that another day! 😄
The second folder, UIPages, is where we'll be working from today. This is where you define C# classes to build up the pages themselves, so this could be for listing pages, add or edit forms, etc. The boilerplate includes an example of a custom template, and an extender to add additional functionality to Kentico's out-of-the-box user listing module.
The last item in the boilerplate is the WebAdminModule class. Let's take a look at the contents:
using Goldfinch.Web.Admin;

using Kentico.Xperience.Admin.Base;

[assembly: CMS.AssemblyDiscoverable]
[assembly: CMS.RegisterModule(typeof(WebAdminModule))]

// Adds a new application category
[assembly: UICategory(
    codeName: WebAdminModule.CUSTOM_CATEGORY,
    name: "Custom",
    icon: Icons.CustomElement,
    order: 100)]

namespace Goldfinch.Web.Admin
{
    internal class WebAdminModule : AdminModule
    {
        public const string CUSTOM_CATEGORY = "goldfinch.web.admin.category";

        public WebAdminModule()
            : base("Goldfinch.Web.Admin")
        {
        }

        protected override void OnInit()
        {
            base.OnInit();

            // Makes the module accessible to the admin UI
            RegisterClientModule("goldfinch", "web-admin");
        }
    }
}
The primary responsibility of this admin module class is to register the client module generated in the Client folder. The RegisterClientModule method within this admin module class takes an organization name and project name, both of which should match the values within Client/webpack.config.js.
You'll also notice there's an assembly attribute which registers a UICategory. Here we are adding a new category to store our custom module applications under. This is entirely optional, as you can still put applications under the Kentico categories already provided.
Step 6: Create an application tile
Now that we have a custom category, let's begin by creating the Blog Categories application tile. This tile will be used by content editors and marketers to access our new module.
using Goldfinch.Web.Admin;
using Goldfinch.Web.Admin.UIPages.BlogCategories;
using Kentico.Xperience.Admin.Base;

[assembly: UIApplication(
	identifier: BlogCategoriesApplication.IDENTIFIER,
	type: typeof(BlogCategoriesApplication),
	slug: "blog-categories",
	name: "Blog categories",
	category: WebAdminModule.CUSTOM_CATEGORY,
	icon: Icons.Tags,
	templateName: TemplateNames.SECTION_LAYOUT)]

namespace Goldfinch.Web.Admin.UIPages.BlogCategories
{
	public class BlogCategoriesApplication : ApplicationPage
	{
		// Unique identifier of the application
		public const string IDENTIFIER = "Goldfinch.Web.Admin.Application.BlogCategories";
	}
}
We create a new class that inherits from ApplicationPage and then define an identifier/codename with which we want to register the application. Next, we add an assembly attribute called UIApplication. This attribute allows us to control various aspects of the application, such as the display name, the slug used within the URL when navigating the module, the icon displayed on the tile, and the template used.
The tile added to the admin site will have a Tags icon and have a URL of /admin/blog-categories.
Step 7: Add a listing page
So far, if you clicked the module tile, you'd be greeted with a blank page. We haven't actually told Kentico what to display yet! Our aim here is to have a listing page which shows a list of Blog Categories that have been created within the module, ideally looking something like this.
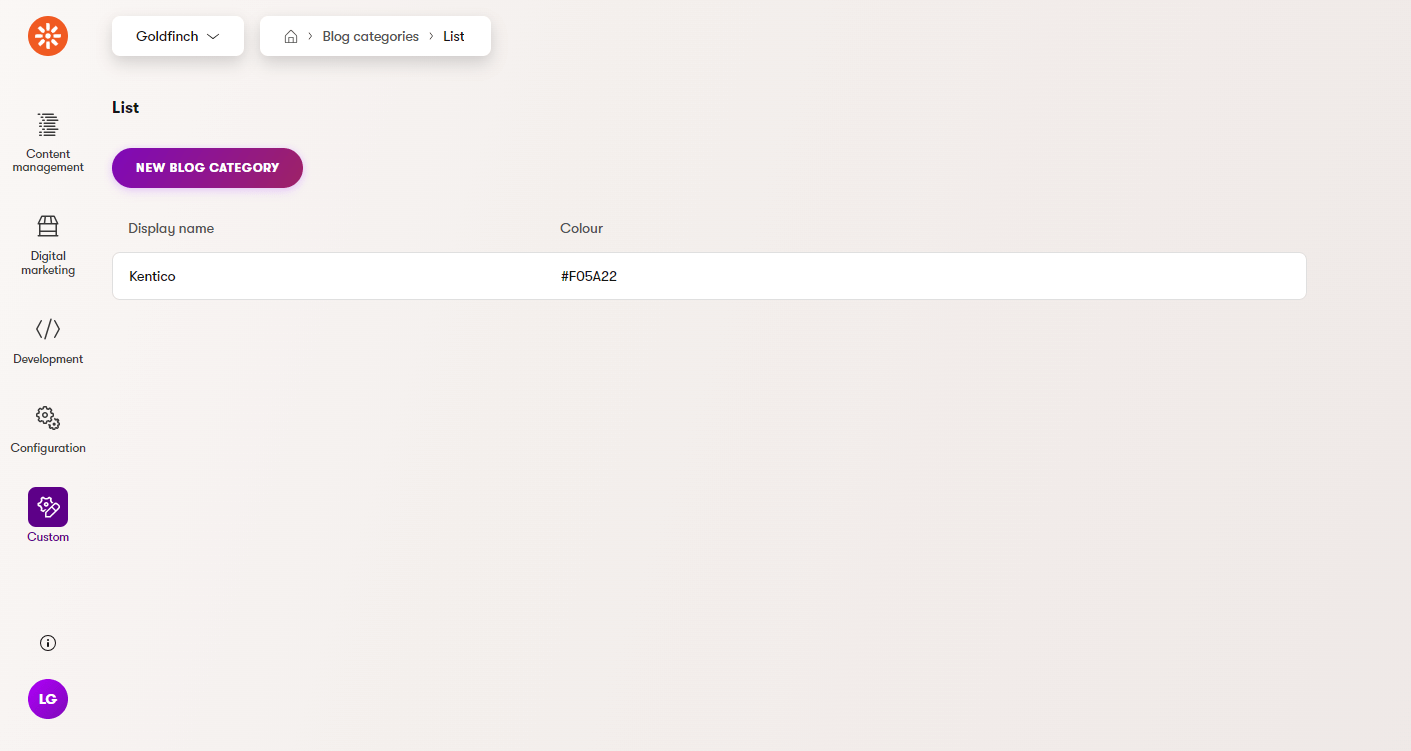
When you look at the class for this listing page, you will probably start to notice a pattern that emerges with these UI Pages. We always create a class, make it inherit from a Kentico class (ListingPage in this instance), and add an assembly attribute (UIPage).
using BlogCategories;
using Goldfinch.Web.Admin.UIPages.BlogCategories;
using Kentico.Xperience.Admin.Base;
using System.Threading.Tasks;

[assembly: UIPage(
    parentType: typeof(BlogCategoriesApplication),
    slug: "list",
    uiPageType: typeof(BlogCategoryListing),
    name: "List",
    templateName: TemplateNames.LISTING,
    order: UIPageOrder.First)]

namespace Goldfinch.Web.Admin.UIPages.BlogCategories
{
    public class BlogCategoryListing : ListingPage
    {
        protected override string ObjectType => BlogCategoryInfo.OBJECT_TYPE;

        public override Task ConfigurePage()
        {
            PageConfiguration.ColumnConfigurations
                .AddColumn(nameof(BlogCategoryInfo.BlogCategoryDisplayName), "Display name")
                .AddColumn(nameof(BlogCategoryInfo.BlogCategoryColour), "Colour");

            return base.ConfigurePage();
        }
    }
}
This time, we need to inform Kentico about the usage of this listing page. To do this, we set the attribute's parentType parameter to the application class we created in step 6. Additionally, the attribute has a slug of "list" configured, resulting in the listing page URL being /admin/blog-categories/list.
Additionally, a listing page requires information about the object type it should list, so we need to configure the ObjectType property using the generated info class.
The ConfigurePage method allows us to configure the listing itself. This is equivalent to creating the layout XML file in Kentico Xperience 13. In this example, I'm adding the two columns from the Blog Category object type and including a name for each column.
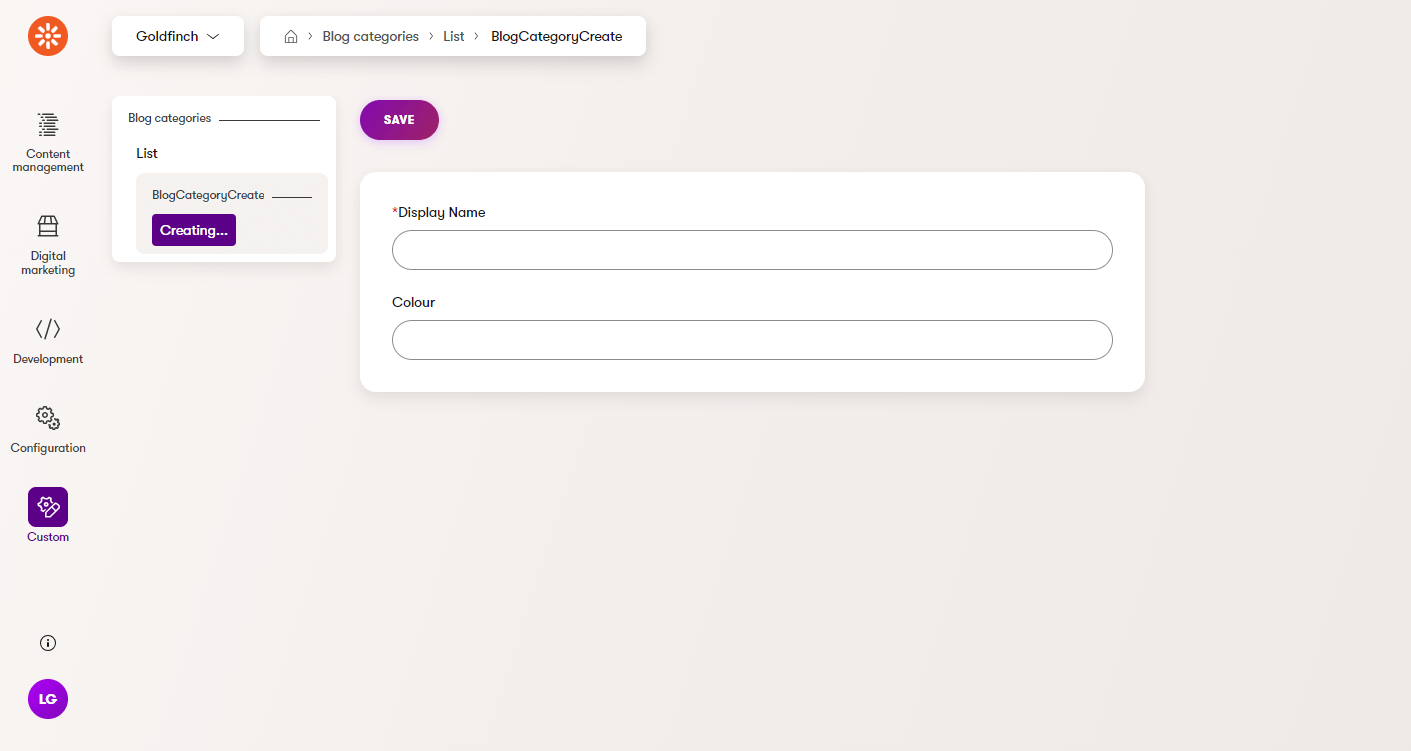
Step 8: Allow users to create blog categories
Having a listing page will be useful only if we allow users to create the objects in the first place. Therefore, the next step is to add a UI Page that enables this functionality.
The class for a create page differs slightly from the previous examples, mainly because it needs to inherit from the CreatePage class. The CreatePage class takes two types as parameters: the first one is the info class for which we're setting up the create page, and the second one is the page to which a user will be redirected after the object has been created. Typically, this will be the edit screen, but we'll be implementing that in step 9.
using BlogCategories;
using Goldfinch.Web.Admin.UIPages.BlogCategories;
using Kentico.Xperience.Admin.Base;
using Kentico.Xperience.Admin.Base.Forms;

[assembly: UIPage(
	parentType: typeof(BlogCategoryListing),
	slug: "create",
	uiPageType: typeof(BlogCategoryCreate),
	name: "BlogCategoryCreate",
	templateName: TemplateNames.EDIT,
	order: 200)]

namespace Goldfinch.Web.Admin.UIPages.BlogCategories
{
	public class BlogCategoryCreate : CreatePage<BlogCategoryInfo, BlogCategoryEditSection>
	{
		public BlogCategoryCreate(IFormComponentMapper mapper, IFormDataBinder binder, IPageUrlGenerator generator)
			: base(mapper, binder, generator)
		{
		}
	}
}
However, just adding the CreatePage class is not enough for the create page to work. We also need to inform the listing page about its existence and add it as a button above the listing. To achieve this, we just need to add a single line to the ConfigurePage method:
PageConfiguration.HeaderActions.AddLink<BlogCategoryCreate>("New blog category");Now, when users click the 'New blog category' button, it will redirect them to the create form, which now has the URL /admin/blog-categories/list/create.
Step 9: Allow users to edit blog categories
With the listing so far, clicking on an item in the list won't do anything. We still need to wire up an edit screen, which consists of two classes: one that allows for the ID of the edited object to be parameterized into the URL, and the second that represents the actual edit form.
To set up the parameterization, we'll create a class that inherits from EditSectionPage. The process is straightforward; Kentico provides a constants class that contains the slug we need to use: PageParameterConstants.PARAMETERIZED_SLUG.
using BlogCategories;
using Goldfinch.Web.Admin.UIPages.BlogCategories;
using Kentico.Xperience.Admin.Base;

[assembly: UIPage(
	parentType: typeof(BlogCategoryListing),
	slug: PageParameterConstants.PARAMETERIZED_SLUG,
	uiPageType: typeof(BlogCategoryEditSection),
	name: "Edit section for blog category objects",
	templateName: TemplateNames.SECTION_LAYOUT,
	order: 300)]

namespace Goldfinch.Web.Admin.UIPages.BlogCategories
{
	public class BlogCategoryEditSection : EditSectionPage<BlogCategoryInfo>
	{
	}
}
This parameterized slug generates a URL of /admin/blog-categories/list/{id}, where {id} is automatically replaced with the ID of the object you've clicked on in the object listing.
The second class completes the edit screen and follows a similar process as previous UIPages. It inherits from a Kentico class and adds an attribute.
using BlogCategories;
using Goldfinch.Web.Admin.UIPages.BlogCategories;
using Kentico.Xperience.Admin.Base;
using Kentico.Xperience.Admin.Base.Forms;

[assembly: UIPage(
	parentType: typeof(BlogCategoryEditSection),
	slug: "edit",
	uiPageType: typeof(BlogCategoryEdit),
	name: "Edit a blog category",
	templateName: TemplateNames.EDIT,
	order: UIPageOrder.First)]

namespace Goldfinch.Web.Admin.UIPages.BlogCategories
{
	public class BlogCategoryEdit : InfoEditPage<BlogCategoryInfo>
	{
		public BlogCategoryEdit(IFormComponentMapper formComponentMapper, IFormDataBinder formDataBinder)
			: base(formComponentMapper, formDataBinder)
		{
		}

		[PageParameter(typeof(IntPageModelBinder))]
		public override int ObjectId { get; set; }
	}
}
We need to implement the ObjectId property here, but we can utilise Kentico's PageParameter attribute to handle it. By informing the attribute about the type of binder we expect to use, the handling will be taken care of.
The edit screen is now ready, but the object listing still doesn't know of its existence! We need to go back to the listing's ConfigurePage method again and add the following line:
PageConfiguration.AddEditRowAction<BlogCategoryEdit>();Additional support
If you feel inspired to create your own custom modules in Xperience by Kentico, you can read more about it on the Kentico docs. There's a section dedicated to extending the administration interface. The docs also contain an example of creating an Office management application, guiding you through a similar step-by-step process of creating a custom module.
Or, if you've done enough reading and want to get straight into coding, then there are a couple of new tools created by Sean G. Wright, Kentico's Lead Product Evangelist. He's created a collection of VS Code snippets, making it far quicker and easier to create these UI Pages without needing to refer to the documentation too often. If VS Code isn't your IDE of choice, then there's the .NET Item Templates package, which allows you to achieve similar efficiencies, whether you prefer the command line or working within Visual Studio itself.
This article was written using Xperience by Kentico version 26.4.0.