In Part 1, I walked through migrating my self-hosted Xperience by Kentico website to Kentico SaaS, manually deploying via the Xperience Portal to prove the migration path. 👏
Manual upload is fine when you're testing to make sure your project is SaaS deployable, but going forward we want something much better: automated deployments. 🤖
In this post, I'll show the changes I made to my existing Azure DevOps CI/CD pipelines to switch from self-hosted to SaaS deployments. Let's get started!
Why Automate SaaS Deployments?
While uploading a deployment package manually through the Xperience Portal is great for an initial deployment, it quickly becomes unsustainable for real projects. Kentico recommends deploying to production early, and regularly. Automating deployments will ensure that every deployment will be:
- ✅ Consistent - the same deployment steps every time
- 🚀 Fast - no manual zipping and uploading
- 🛡️ Reliable - no missed steps or human errors
- 🧪 Tested - steps can include automated testing to catch issues early
Old Pipeline
Before migrating to SaaS, my existing CI/CD flow was built around deploying to a self-hosted environment. Let's takes a look at how the setup worked. 👀
The process started with a build pipeline that handled compiling the website and producing a deployment package ready for release.
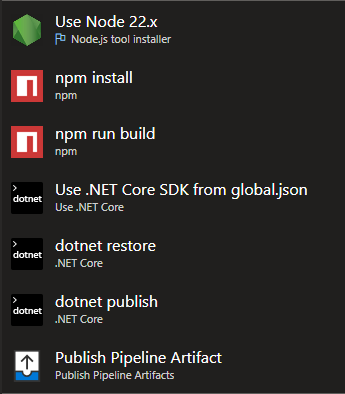
The first part of the pipeline focuses on building the front-end assets. I always aim to use the latest LTS version of Node.js, so the pipeline starts by making sure the agent has it installed. Next, it runs npm install to download and set up all of the project's dependencies. Finally, it compiles the front-end source files into optimised, production ready assets that can be deployed.
The next phase handles the .NET backend. The pipeline uses the .NET SDK version specified in the global.json file to ensure compatibility, then runs dotnet restore to pull in all required NuGet packages. After that, it runs dotnet publish to compile and prepare the application for deployment.
Once the build is complete, the final task packages up everything into an artifact, essentially a zip file containing all of the files produced by the dotnet publish command. This artifact is then made available for the release pipeline to deploy.
The release pipeline picks up the artifact, extracts it onto the shared server, ensures IIS is configured with the correct bindings, and applies environment specific configuration transformations. As this part of the pipeline will be completely replaced, I won't be spending time covering it here.
New Pipeline
The new pipeline still follows the same core flow of setting up Node.js and building the front-end assets, restoring .NET project dependencies, and preparing the application for deployment. 👍
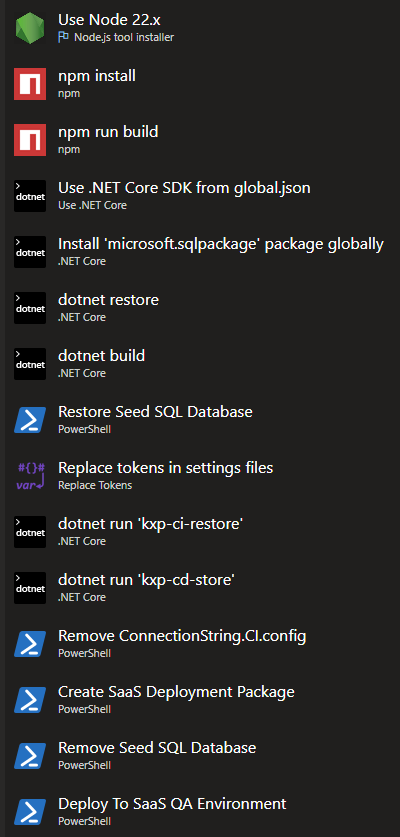
However, as you can see, it introduces additional steps to set up and tear down a temporary SQL database.
It starts by running a dotnet command to ensure the Microsoft.SqlPackage tool is available. This is needed to the pipeline can interact with the SQL Server instance to create and manage the temporary database.
You might be wondering why the database is needed at all. 🤔
The main reason is that I don't want the CD files committed to source control, only the configuration file should be. Secondly, even if the CD files were committed, there would always be a risk that a developer might forget to commit the latest version, introducing potential errors during deployment.
With the SQL tools installed, the next phase is restoring the Seed SQL Database. This is handled by a PowerShell script, which restored a lightweight .bacpac file from source control onto the SQL Server instance. This same seed database is what a new developer would use to get the project set up locally for the first time.
Once the database is restored, we use the Replace tokens in settings files task to ensure that the built project has the correct connect string by injecting the required secrets stored securely in Azure DevOps.
With everything configured, we can now the run the CI restore command. This step updates the temporary database with the latest serialised objects from the file system. This is exactly the same process a developer would run locally to bring their local environment up to date.
dotnet run --kxp-ci-restoreAt this point, you have a site fully configured with an up to date database. You could extend the pipeline to run any automated tests included in your solution, and if any fail, you can stop the deployment from proceeding further.
Next, the pipeline runs the CD store command. This step should look familiar if you followed the previous blog post, it serialises database objects to the file system, preparing them for deployment.
The only difference now being that the command targets the working directory inside the pipeline environment, rather than relying on my local file system.
dotnet run --no-build -- --kxp-cd-store
    --repository-path "$(System.DefaultWorkingDirectory)\src\Goldfinch.Web\`$CDRepository"
    --config-path "$(System.DefaultWorkingDirectory)\src\Goldfinch.Web\App_Data\CDRepository\repository.config"
Once the CD store process is complete, the pipeline removes the connection string file from the file system. It has served its purpose, and we definitely don't want any secrets being deployed to SaaS. 😁
With the project cleaned up, the pipelines runs the Export-DeploymentPackage.ps1 scripts just like we did during the manual deployment process. This creates the deployment package that will be uploaded to the Xperience Portal.
There's one final cleanup task, deleting the seeding database from the SQL Server instance. We don't want to leave anything behind after the build completes!
The Deployment
The Deploy To SaaS QA Environment task runs a custom PowerShell script which follows the exact steps from the documentation. It simply makes a POST request to the Xperience Portal API, using a bearer token for authentication, and the deployment package.
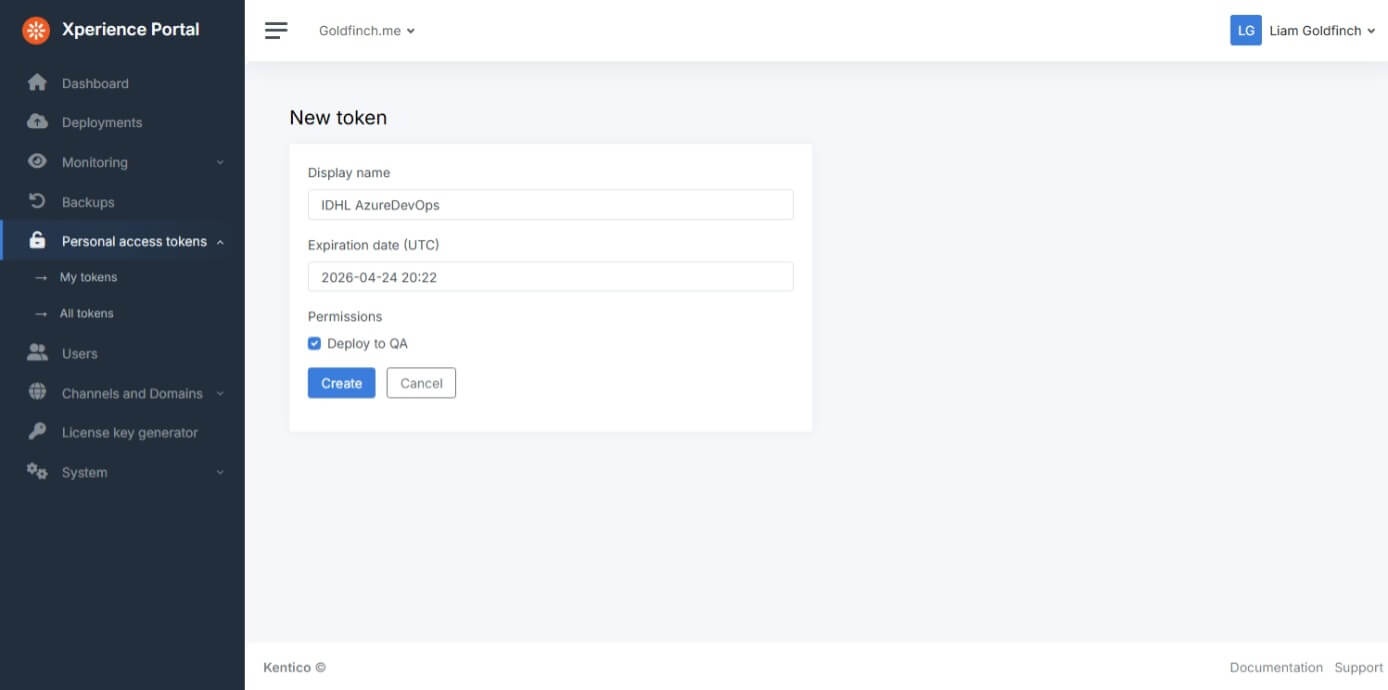
To generate a bearer token, you'll need to create a Personal Access Token (PAT) within the Xperience Portal. There's a dedicated area inside the Portal to manage and generate PATs:
Now, when you run the pipeline (because it always works perfectly first time, right? 😉), you'll see a deployment appear in the Deployments dashboard! 👏
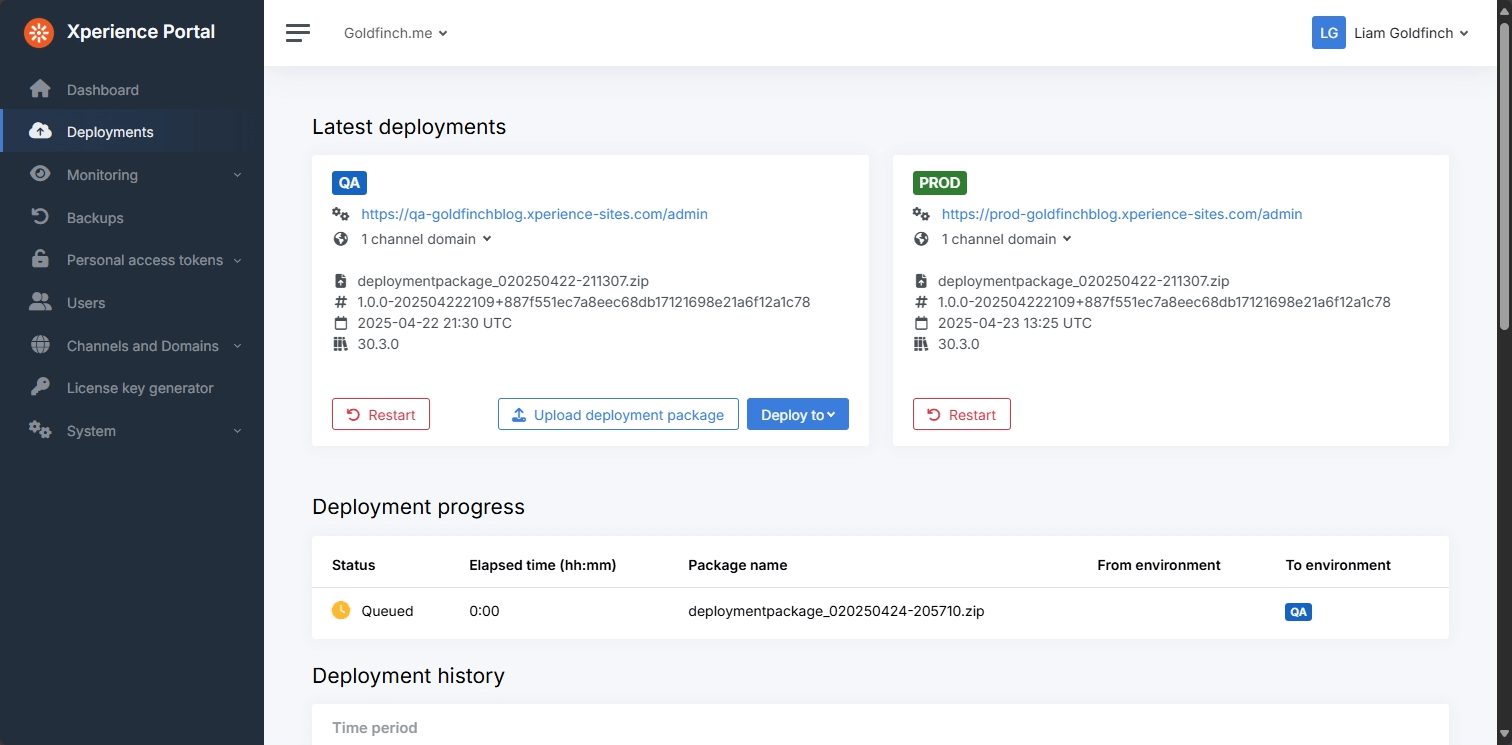
Remember, whether you're deploying manually of through automation, deployments can currently only be uploaded directly to the QA environment.
You can't skip QA and deploy straight to another environment, at least not yet. Maybe one day in the future? 🤞
Once your deployment appears in QA, it can be promoted to the next environment just like a manual deployment, once the testers have approved the QA site.
The pipelines I have shown in this post use the classic visual editor in Azure DevOps. However, I'd recommend switching to YAML based pipeline where possible. It makes it easier to reuse across new projects, and because it's stored in source control it evolves alongside your existing codebase.
Coming Next...
Migrating to SaaS didn't mean starting from scratch with automated deployments, but I did need to adapt it.
The core CI/CD principles hadn't changed, I was still building, testing, packaging, but instead of deploying to a self-hosted server, I was using Xperience Portal's deployment API endpoint.
👉 Up next, lessons learned and troubleshooting tips! 💡